My Scrappy Guide.js
Project Github Link: https://github.com/neuralfirings/guide
Over the past few posts, I've written some guides and tutorials on using the ESP8266 chip. People who read it seems to like I would like to continue publishing more of these as I venture into different hardware & software projects.
Some projects I'd like to try: Internet Controlled Motor (continued), Keychain/Pendant Gameboy emulator, Alternative Reality App, and so on. As I go through these projects, I visit tutorial sites because the internet is how I learn things these days. Oftentimes, it's hard to glance and get a good idea of what to do in the tutorials. Even on my own blog, I don't think the tutorials and guides I write are that easy to parse.
So I scrapped together Guide.js to make it easier to write iFixit style tutorial guide. I like their style. It forces writers to have clear images. The bullets make it seem less intimidating. The layout makes it easy to scroll through and get a rough idea before you dive in.
Guide Template Features
- iFixit Style Guides: big images (optional carousel) on the left side and text on the right
- Responsive: when the screen is smaller, the title bounce above the images and the image becomes full screen
- Extensible Main Feature: Have a step that doesn't involve images? That's fine too. You can put whatever you want as the "main feature" of a given step
Example 1: Simple Image Based Guide
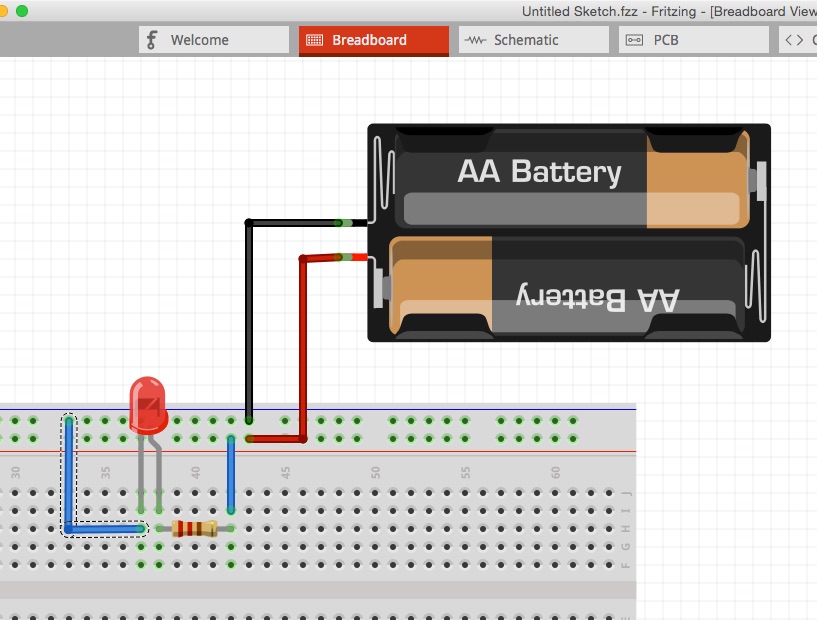
Step 1
- Open Fritzing
- Make sure you're in BreadBoard View
- Search for components and drag in to mimic your setup
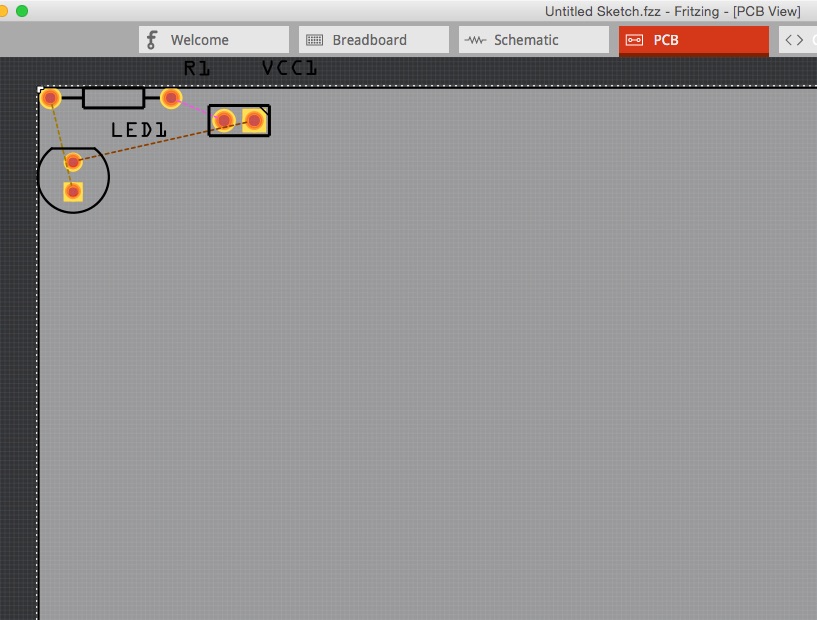
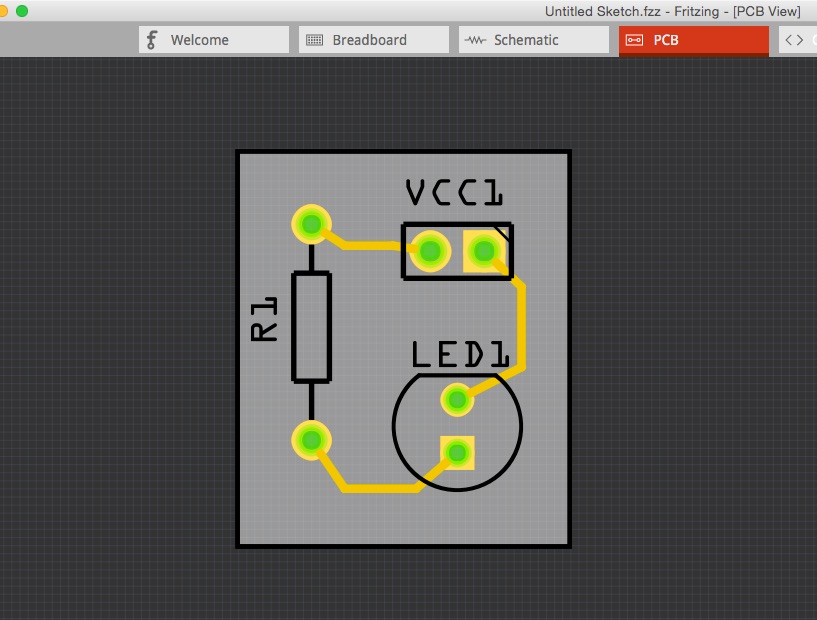
Step 2
- Switch to PCB Tab
- Click on components and use Cmd+R/Ctrl+R to rotate
- You can drag components around by holding down the left mouse button
- Click on the wires to route and add bendpoints
- Resize the board appropriately
The Code
<div class="guide-step">
  <div class="guide-images">
    <img src="http://www.nyl.io/guide/01_breadboard.jpg" data-caption="Fritzing Bread Board View">
  </div>
  <div class="guide-text">
    <h2 class="guide-title">Step 1</h2>
    <ul>
      <li>Open Fritzing</li>
      <li>Make sure you're in BreadBoard View</li>
      <li>Search for components and drag in to mimic your setup</li>
    </ul>
  </div>
</div>

<div class="guide-step">
  <div class="guide-images">
    <img src="http://www.nyl.io/guide/02a_pcb_airwires.jpg" data-caption="Fritzing PCB View: Airwires">
    <img src="http://www.nyl.io/guide/02b_pcb_routed.jpg" data-caption="All airwires are routed and board is resized">
  </div>
  <div class="guide-text">
    <h2 class="guide-title">Step 2</h2>
    <ul>
      <li>Switch to PCB Tab</li>
      <li>Click on components and use Cmd+R/Ctrl+R to rotate</li>
      <li>You can drag components around by holding down the left mouse button</li>
      <li>Click on the wires to route and add bendpoints</li>
      <li>Resize the board appropriately</li>
    </ul>
  </div>
</div>
Example 2: Using different Main Components
If you want something more complex, you can also use the guide-main class to put in any random thing, like code blocks or presentations (which I do using Impress.js... well, a hacked version I made with some added features like captioning).
var ua = navigator.userAgent.toLowerCase();
if(ua.search(/(iphone)|(ipod)|(android)/) != -1) {
  $(".not-for-mobile").hide();
  $(".for-mobile").show();
}
else {
  $(".not-for-mobile").show();
  $(".for-mobile").hide();
}
Step 1: Some title
Here are some example code as the main feature.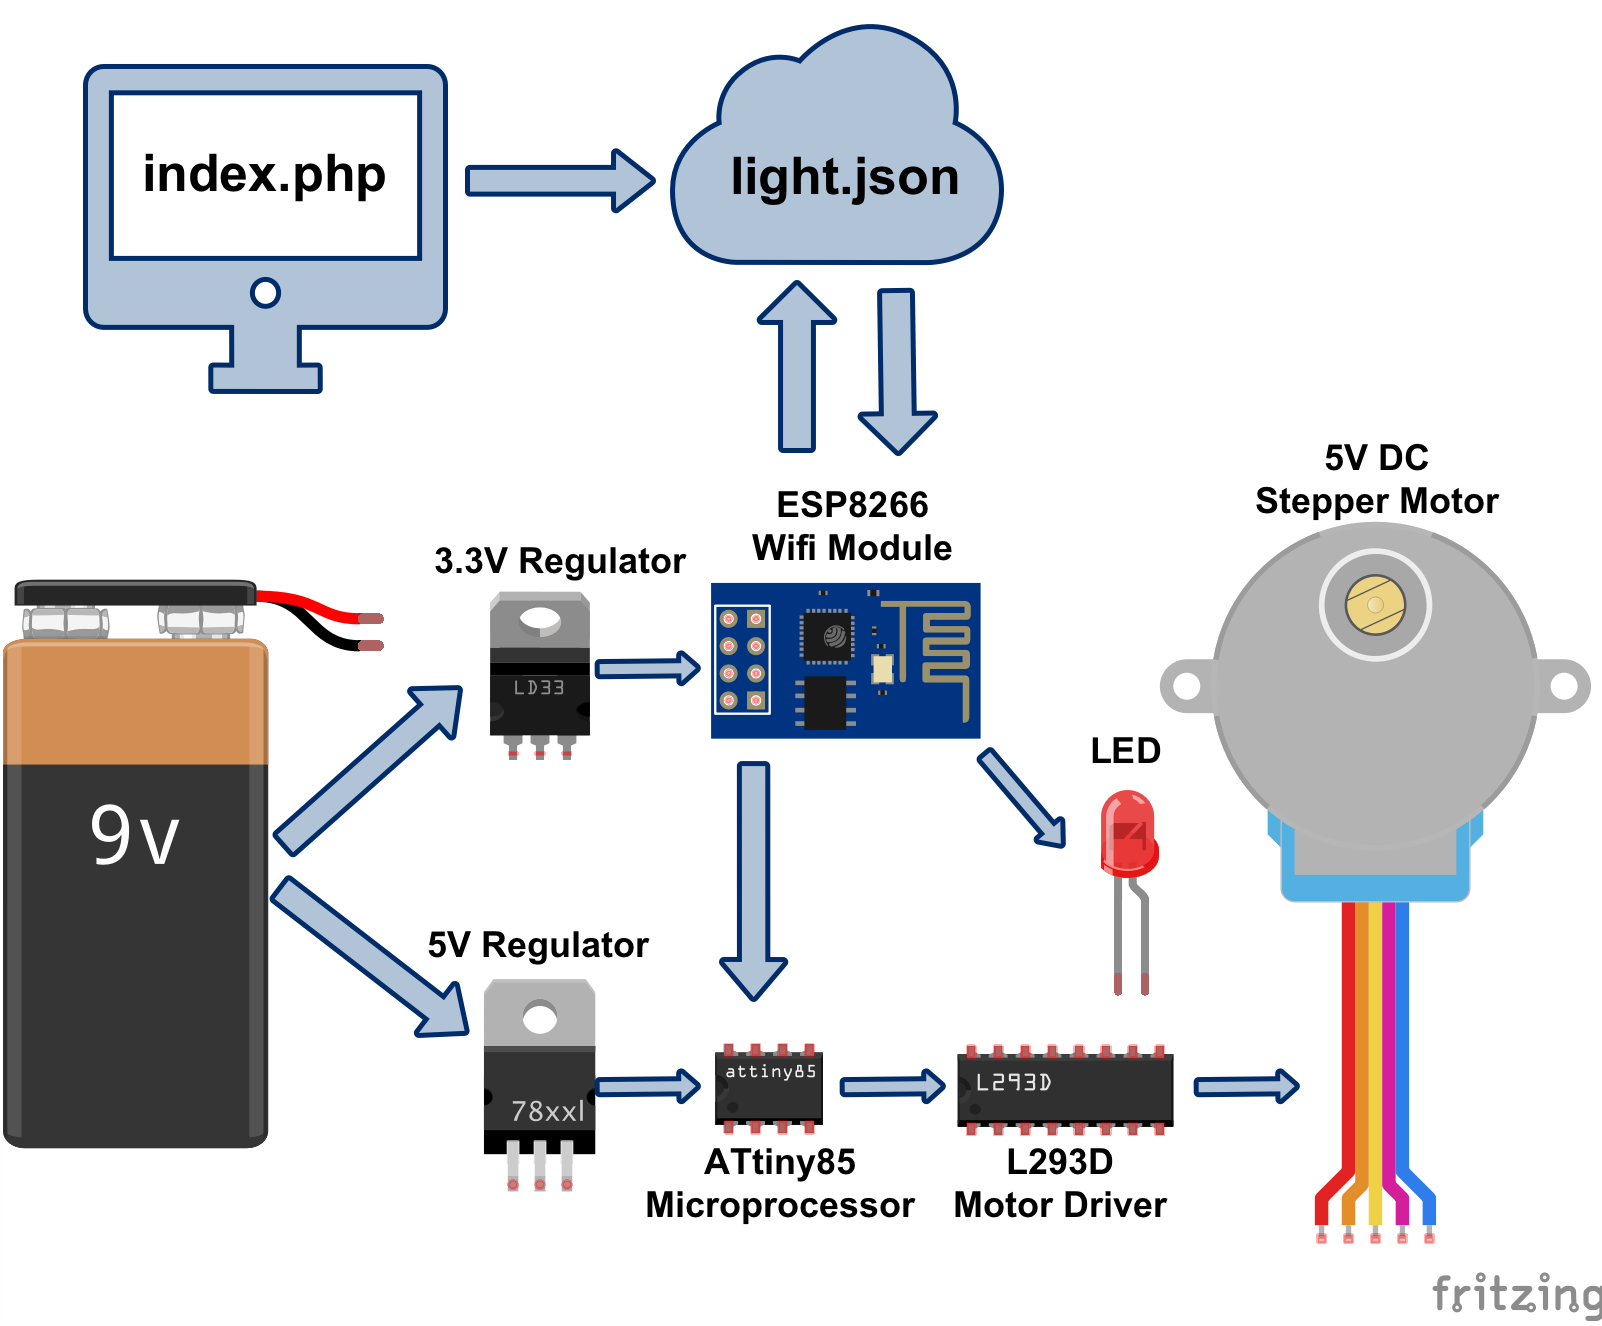
<div class="not-for-mobile" style="position:relative; padding-bottom: 75%; padding-top: 25px; ">
<iframe class="macdown-hide" frameborder="0" src="http://nyl.io/impress/espmotor.html" style="position: absolute; top:0; left:0; width: 100%; height: 100%"></iframe></div>
Step 2: Some other title
This is something made with impress.js.. well, a hacked version made for presenting with captions and some tweaked for mobile "support."
The Code
<div class="guide-step">
  <div class="guide-main">
    <pre>
      <code>
var ua = navigator.userAgent.toLowerCase();
if(ua.search(/(iphone)|(ipod)|(android)/) != -1) {
  $(".not-for-mobile").hide();
  $(".for-mobile").show();
}
else {
  $(".not-for-mobile").show();
  $(".for-mobile").hide();
}
      </code>
    </pre>
  </div>
  <div class="guide-text">
    <h2 class="guide-title">Step 1: Some title</h2>
    Here are some example code as the main feature.
  </div>
</div>
<div class="guide-step">
  <div class="guide-main">
    <div class="for-mobile">
    <a target="_blank" href="http://nyl.io/impress/espmotor.html?mobile=on"><img src="http://nyl.io/impress/espmotor.png"></a>
    </div>

    <div class="not-for-mobile" style="position:relative; padding-bottom: 75%; padding-top: 25px; ">
    <iframe class="macdown-hide" frameborder="0" src="http://nyl.io/impress/espmotor.html" style="position: absolute; top:0; left:0; width: 100%; height: 100%"></iframe></div>
  </div>
  <div class="guide-text">
    <h2 class="guide-title">Step 2: Some other title</h2>
    <p>This is something made with impress.js.. well, a hacked version made for presenting with captions and some tweaked for mobile "support."</p>
    <div class="for-mobile">
      Click on the diagram on the left to go through the workflow. It will open up a new page. Once you are on the new page, click on the RIGHT SIDE of the screen to go forward, and click on the LEFT SIDE of the screen to go back.
    </div>
    <div class="not-for-mobile">
      Click on the diagram on the left to go through the workflow.
    </div>
  </div>
</div>
Next Steps
I will use Guide.js to write guides for this blog going forward, and maybe write a Guide to the Guide. Hehe. If I want to get really fancy, create some sort of a Markdown conversion since my blog is written using Markdown.