Building a Serverless Website with AWS
So I've been fiddling around with AWS and setting up serverless computing. This means you can host a website that does complex things without setting up a web server. It's pretty awesome. Why, you ask?
- Pay per use: If you have a server, you have to pay a monthly fee depending on the type of server (size, bandwidth, storage, blah blah blah). If you go serverless, you pay only for what you use. So for each API call, or user getting a web page, you pay only for that. This is good for prototyping since prototypes don't get a lot of users, so you just need something cheap to demo a project.
- Easy set up: You can whip up an HTML site without setting up Apache or Nginx web servers, for example. You can just focus on code.
Basic Components

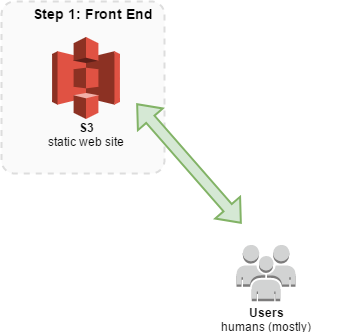
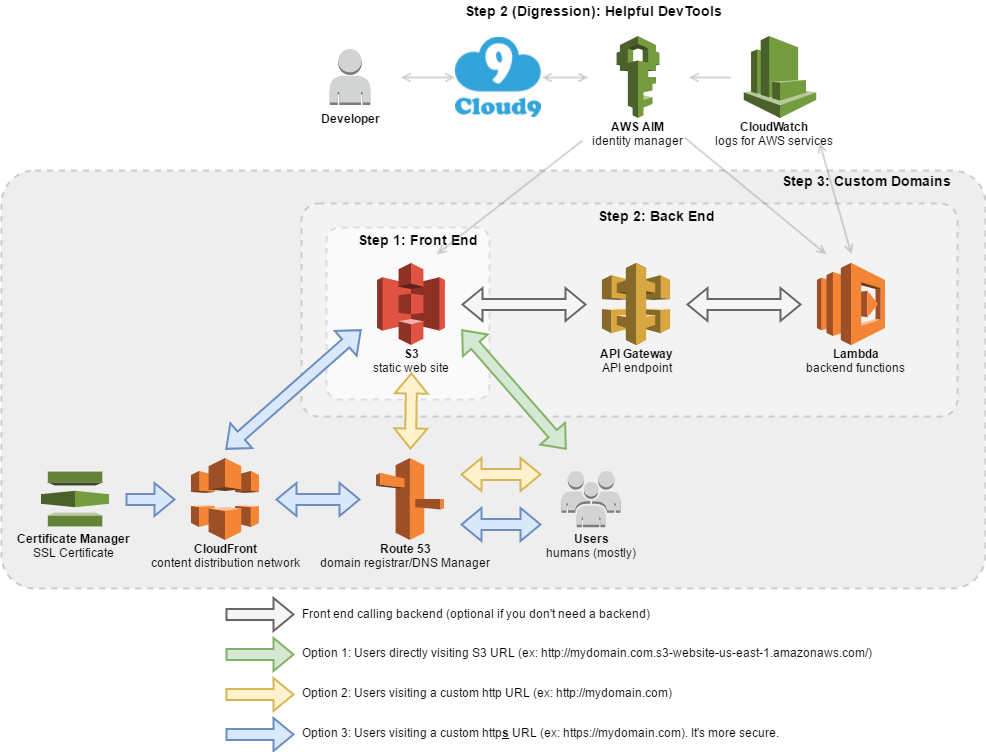
Step 1, Build Front End: If you want a super simple, static HTML site, then all you need is an S3 Bucket with static webhosting.
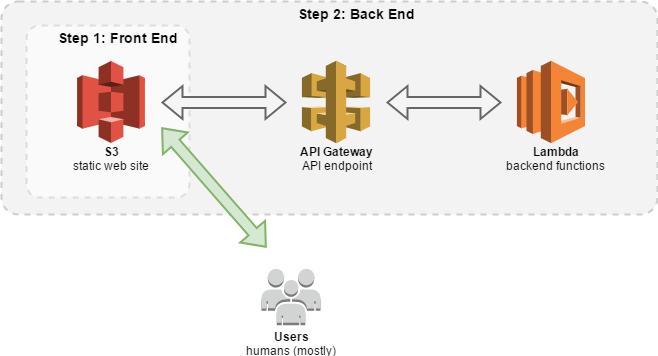
Step 2, Build Back End: If you want some more complicated back end logic, then you also need an Lambda Function that your website can access via an API Gateway endpoint.
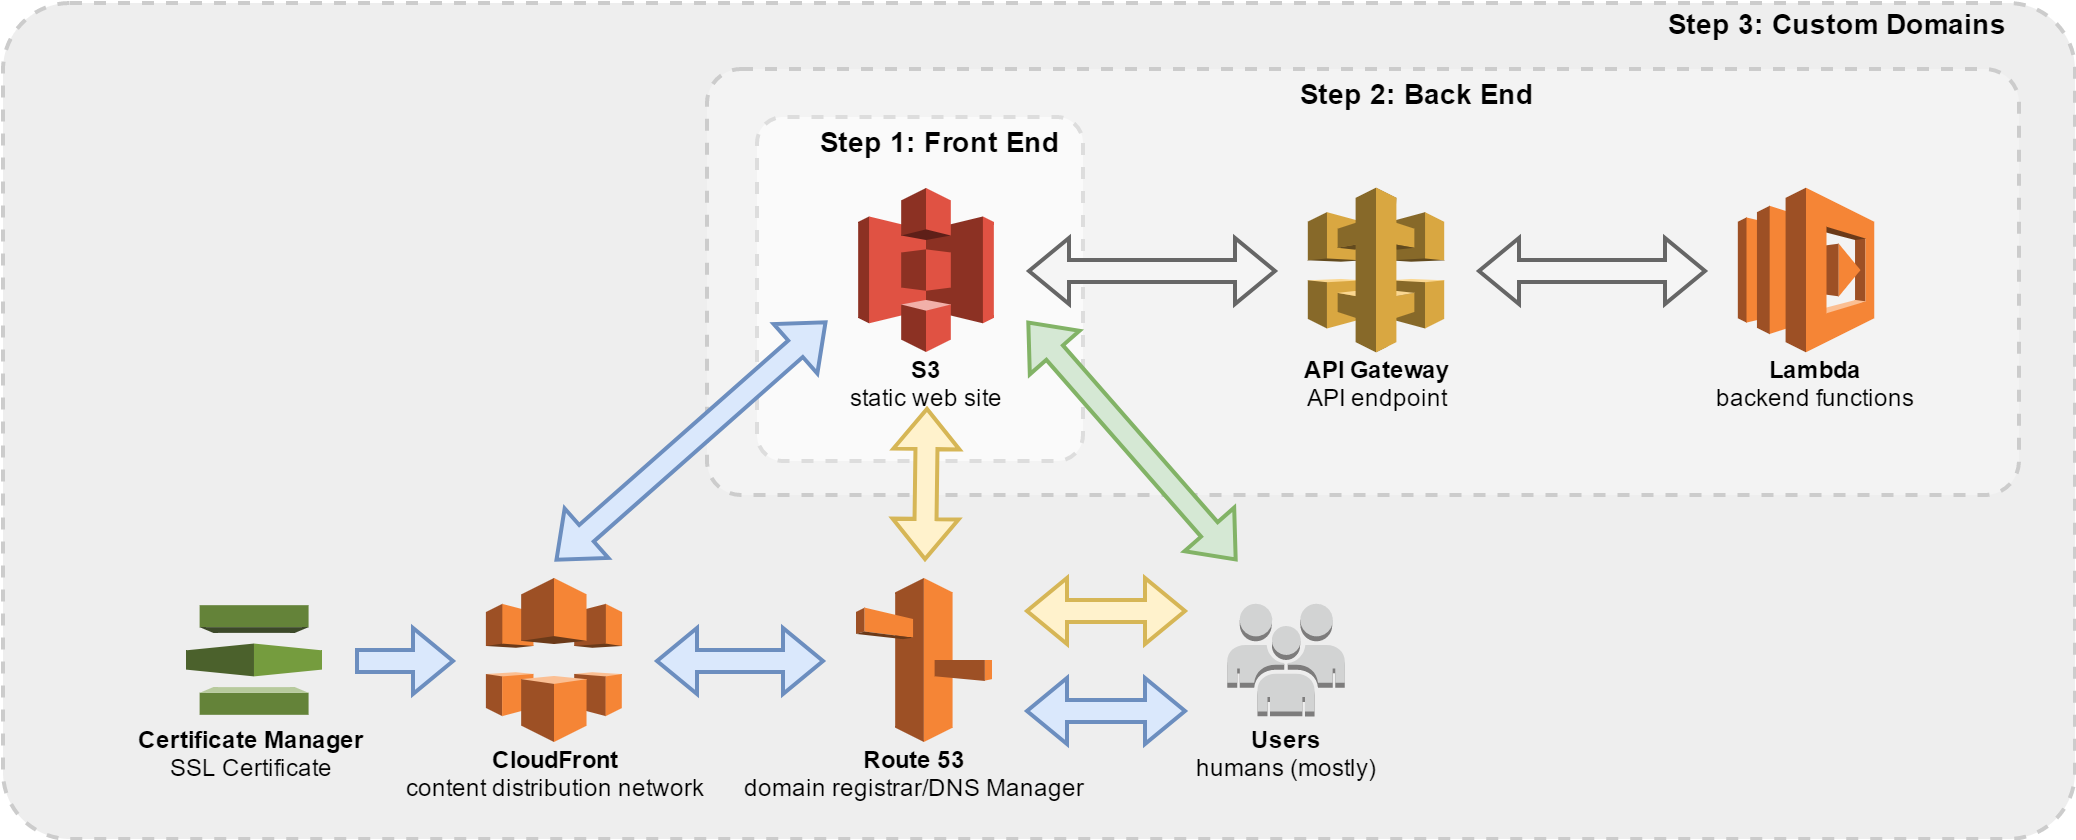
Step 3, Set Up Custom Domains: If you want to use your own domain name (and/or purchase a domain name), you should set up a Route 53 to register a domain name and/or set up DNS Zones. If you want to your own domain to have SSL (use https instead of http), you can get a free certificate using Certificate Manager and hook that up with Cloudfront.
These are all components and options. You don't need all of these. But, since I've figured out how to set this up, I thought I'd put my notes on the interwebs in case you are interested in a similar set up.
Here's a story of how this all goes down:
Once upon a time, a user goes to a web address. The domain registrar looks up Name Space for this domain and find a Route53 DNS Zone. Route53 then tells the user, "Hey, for this domain you should look at what Cloudfront is up to. Cloudfront is then like, "Yo, I got an https certificiate for this domain so I can hook you up to the content on this domain through a secure pipe so jokers can't sniff your traffic and see what's up." Cloudfront also says "And BTW, you should check out the content on S3." S3 then gets a call from Cloudfront and says "Check it out, here's your awesome content."
Sometimes, S3 needs to call a server to generate even more awesomer content. So S3 is all "'Sup API Gateway, I need some processing on these parameters, the name is blah, and the password is blah." In this case, the name and password are both parameters. Then, API gateway is like "Gotcha, Imma pass these parameters to Lambda Function." Lambda Function then says, "Nice, I can use these parameters to do crazy calculations and return an ouput. The ouput for this is: user is authenticated." API Gateway then replies, "Sweetness, Imma pass this back to the static webpage hosted on S3."
S3 then gets the content from API Gateway and renders it for the user. The end. Simple!
Step 1: Host a Static Site
(If you haven't already, you should get an AWS Developer Account. This enables you to use all the goodies I described above.)
Go to AWS S3 (Simple Storage Service).
- Create a Bucket
- Bucket Name: your domain (e.g., mydomain.com). It can really be anything (e.g., foobar) but if you have a domain, it's just more organized to name it your domain so you know what the folder is for.
- Click next a bunch of times until your bucket is made
- Click your bucket > Properties Tab > Static website hosting
- Select Use the bucket to host a static website
- Index document: index.html
- Error document: error.html
- Click your bucket > Permissions Tab > Bucket Policy > Copy/Paste in the policy below (replace
MyBucketNamewith your actual bucket name)
{
  "Version": "2012-10-17",
  "Statement": [
    {
      "Sid": "PublicReadGetObject",
      "Effect": "Allow",
      "Principal": "*",
      "Action": "s3:GetObject",
      "Resource": "arn:aws:s3:::MyBucketName/*"
    }
  ]
}
Ok, now you should be set up. You can use a text editor to make a website, name it index.html. Here's some code for your html file you can use.
<html>
  <body>
    Hello world
  </body>
</html>
- Upload to S3: Click your bucket > Object Tab > Upload Button > Upload your
index.htmlfile - Go to S3 > Your Bucket > Properties Tab > Static Web Hosting to fetch your endpoint. It should look something like this: http://yourdomain.come.s3-website-us-east-1.amazonaws.com. Visit that page to see your site.
Want to add some backend code? Venture on to Step 2.
Step 2: Hook Site to Backend
Ok, so that's cool. Now you want to do something more complicated. You want the user to tell you their name and give them a personalized Hello World message. Like "Hello World, Michael." (Yes, I know this can be done through front end Javascript, but this is just an example OK?)
Now you need to set up a backend. I like to use Node.js since then I can use the same language (Javascript) for both front end and back end. Do to this, let's set up a Lambda Function and an API Gateway API.
Go to AWS Lambda.
- Click Create a Lambda Function
- Search for "microservice-http-endpoint" in the Filter text, Select the one for Node
- Security: Open (this way your S3 website can call the API)
- Click Next
- Fill out these values
- Name, Description: Whatever you want
- Role: Create New Role From Templates
- Rolename: Whatever you want
- Click Next
- Click Create Function
- Copy/paste in the following code:
'use strict';
exports.handler = (event, context, callback) => {
  // Pre process input params
  var input = {};
  if (event.httpMethod == 'POST') {
    input = JSON.parse(event.body);
  }
  else if (event.httpMethod == 'GET') {
    input = event.queryStringParameters;
  }

  // Main body of the Lambda Function
  var output = {
    "status": "success",
    "message": "Hello World, " + input.name
  };

  // Callback to generate Lambda's response
  callback(null, {
      "statusCode": 200,
      "headers": {
        "Access-Control-Allow-Origin" : "*", // Required for CORS support to work
        "Access-Control-Allow-Credentials" : true // Required for cookies, authorization headers with HTTPS
      },
      "body": JSON.stringify(output),
  });
};
This takes the name input and generates a string Hello World, [name].
You can test this by clicking the "Save and Test" or "Test" button. This is the blue button at the top. When testing, you can use the template "API Gateway AWS Proxy" to simulate an API Gateway request.
Now, we need to hook up this Lambda with an API Gateway. This creates an https://blahblah/blah endpoint that your web site on S3 can call to get content.
Go to AWS API Gateway.
- Click LambdaMicroservice
- Click NameOfMyLambdaFunction
- Click Action > Create Resource > Check
- Configure as proxy resource: check
- Enable API Gateway CORS: Check this
- Click Create Resource
- Set Up the Resource
- Integration Type: Lambda Function
- Lambda Region: Select the region where your Lambda Function is hosted
- Lambda Function: Type in your Lambda's Function Name
- Click OK
This enables the API Gateway to pass any parameters or inputs through to Lambda. Enabling CORS means other websites (such as the one hosted on S3) can access this API even though it's on a different domain.
Now publish the API by:
- Click Action > Deploy API and fill out:
- Deployment state: prod
- Deployment description: whatever you want
After this is deployed, you can test out your API by visiting the API's public prod URL. You should see an Invoke URL in the blue box. Append /YourFunctionName to the end. Your API's url should be something like: https://ab12cd34ef56.execute-api.us-east-1.amazonaws.com/prod/YourFunctionName. You can also find this by going to your AWS Console > Lambda > YourFunctionName > Triggers tab.
Now that you can call your API, you can update your static web page to call the API.
Go back to AWS S3.
Back in S3, you can upload a new index.html file. This is what I have as an example:
<!DOCTYPE html>
<html>
  <head>
    <script src="https://code.jquery.com/jquery-2.1.4.min.js"></script>
    <script>
      $(document).ready(function() {
        $(".submit").click(function() {
          inputObj = {
            name: $(".name").val()
          }

          $.ajax({
            url: "https://fa89njhst3.execute-api.us-east-1.amazonaws.com/prod/Jokes",
            method: "POST",
            data: JSON.stringify(inputObj),
            success: function (data) {
              $(".msg").text(data.message)
            }
          })
        })
      })
    </script>
  </head>
  <body>
    <input type="text" class="name" placeholder="Enter name" />
    <button class="submit">Submit</button>
    <hr />
    Message:
    <div class="msg"></div>
  </body>
</html>
Now give you website a whirl. You should be able to enter in a name and see the website Hello World that name.
PROTIP: If you want a prettier website, you can use Bootstrap. Lucky for you, I have a template all set up with jQuery, Bootstrap, and Font Awesome here: https://nyl.io/template/source.html.
You might be interested in seeing Lambda logs (e.g., the stuff generated by console.log('blah') for example, errors, etc.) while you work on your Lambda functions.
Go to AWS Cloudwatch.
- Click Logs > click your lambda function
- Click the top stream (each of these links are streams, which are logs from a period of time)
- I usually like to select Expand All: Text in the top right hand corner to see the logs
Remember the streams can stop, so periodically (every few minutes it seems) go back to the streams list and be sure you are reading the latest stream.
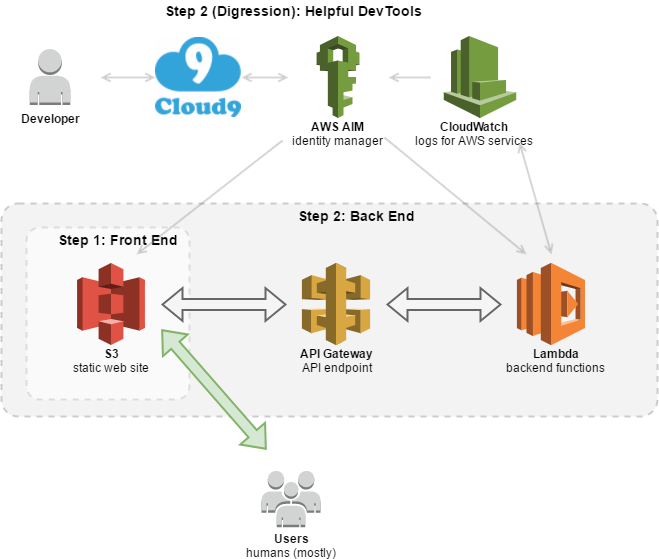
Step 2 Digression: Helpful Dev Tools
Before we go on, I'd like to talk about a few tools I find super helpful. The first is a web-based coding environment called Cloud9. Unlike all other tools here, this is not part of AWS. Oh wait, Amazon did acquire Cloud9 already. With Cloud9, you can develop code through the browser, and it is thusly you can go between different computers with the data sync'd through the cloud.
I'd also like to talk about logs and uploading code! You can use AWS CLI (command line interface) to retrieve Lambda Logs, upload code to S3, and upload code to Lambda. This makes development much easier than always having to use AWS Console to upload files to S3 or write files in the Lambda inline code editor.
Go to Cloud9.
Like a notepad, but a lot more bad-ass, and fully browser based. This means I can go between my bedroom laptop and office computer and not miss a beat. I just fire up my web-browser and continue where I left off. It's where I coded up this blog post as well as the examples in this post. It's a recent AWS Acquisition so I'm hopeful of closer integration with AWS in the future.
Besides a code editor, it also has a terminal feature. This is useful because I can use it to see my Lambda Function's logs. So in your Lambda Function, when you write console.log("blah"), it actually pops into a service called Cloudwatch. The Cloudwatch console is not as helpful since they break down logs into streams and you constantly have to close one stream and open another stream. I prefer the command line interface much more, and this can be used in Cloud 9's Terminal (or any other terminal).
In Cloud9, once you set up a workspace, open the terminal and do the following to set up awscli (lets you do thinks like sync S3 Buckets an upload code to Lambda) and awslogs (lets you stream Cloudwatch logs).
$ sudo apt-get update
$ sudo apt-get install python-dev -y
$ curl "https://s3.amazonaws.com/aws-cli/awscli-bundle.zip" -o "awscli-bundle.zip"
$ unzip awscli-bundle.zip
$ sudo ./awscli-bundle/install -i /usr/local/aws -b /usr/local/bin/aws
$ aws --version
You should see something like aws-cli/1.11.80 Python/2.7.6 Linux/4.9.17-c9 botocore/1.5.43.
At this point, you'll need to configure a user in order for your terminal to access your AWS account.
Go to AWS IAM (Identity and Access Management).
- Users > Add User
- Username: whatever you want
- Check Programmatic Access
- Click Next
- Set Permissions
- Click Attach Existing Policies Directly. This lets you attach "policies" which is like permissions to do this or that through AWS.
- To use the command line to sync S3 an Lambda functions, you'll want to find and check these policies: AWSLambdaFullAccess and AmazonS3FullAccess
- Click Next
- Confirm that you are attaching: AWSLambdaFullAccess and AmazonS3FullAccess
- Now note down your Access Key ID and Secret Access Key. You can download the .csv file so you'll have this info stored. The Secret Access Key is only shown once (but you can always generate more access/secret pairs if you lose your secret)
Go back to Cloud9.
Open the terminal (window on the bottom) and type:
$ aws config
Enter in all your credentials.
Now set up awslogs to help compile your Cloudwatch logs.
$ sudo pip install awslogs
AWS Commands
Stream Cloudwatch Logs
To stream Cloudwatch Logs for a particularly Lambda Function named MyLambdaFunctionName
$ awslogs get /aws/lambda/MyLambdaFunctionName ALL --watch
Control+C to stop the stream
Sync S3
Assumes your local folder with all your S3 code is in path/to/local/s3/folder and you want to sync to bucket with name MyBucketName. You can remove the --delete part if you don't want things deleted on S3 just because it isn't present in the local folder.
$ aws s3 sync path/to/local/s3/folder s3://MyBucketName --delete
Sync Lambda
Assumes your local folder with all your Lambda code is in path/to/lambda/code (which can include node packages as well), and your lambda function name is MyLambdaFunctionName. We will first create a temporary zip file of your lambda codes called lambda.zip.
Your local lambda folder should include index.js, which correlates with your Handler value (the default Handler value is index.handler). You can set your Handler value by going to AWS > Lambda > MyLambdaFunctionName > Configuration Tab > Handler text field. So if your Handler is something like foobar.handler, then your main Javascript file in path/to/lambda/code/ should be foobar.js.
$ zip -r -j lambda.zip path/to/lambda/code/*
$ aws lambda update-function-code --function-name MyLambdaFunctionName --zip-file fileb://lambda.zip
Awesome! Now you have your handy dandy website. But wait, http://blahblahblah.s3-website-us-east-1.amazonaws.com is not a very memorable web address. You want your own domain you say? Well, lucky for you, Step 3 is next.
Step 3: Set up Domain Configs
If you want your website hosted on your own domain (e.g., https://mydomain.com), you can do this by using Route 53 (domain name registration, setting domain DNS) if you're fine with just an HTTP website. If you want an HTTPS website, you'll also need Cloudfront (content delivery network) and Certificate Manager (generates free SSL certificates).
Setting up an HTTP domain

Go to AWS Route 53.
To point a domain to S3, you'll need to create a DNS Zone (done for you if you registered through Route 53).
- Route 53 > Hosted Zones > Create Hosted Zone
- Name: mydomain.com (no need for the www part)
Now, let's configure the hosted zone to tell your website where to go.
- Click Create Record Set for your domain (e.g., mydomain.com)
- Name: leave this empty
- Type: A -- IPv4 Address
- Alias: Yes
- Alias Target: select your S3 Bucket, or fill in the domain name for your s3 bucket, it will look something like
s3-website-us-east-1.amazonaws.com. Note that this isn't the full URL to your S3 bucket; it doesn't include the actual bucket name.
- Click Create Record Set for your www domain (e.g.,
www.mydomain.com)- Name: www
- Type: A -- IPv4 Address
- Alias: Yes
- Alias Target: mydomain.com
Note the namespace (or NS) values created for you by Route 53. It will be 4 values with names like ns-128.awsdns-13.com..
Domain name registrars will have NS fields, which points to places that serve your code. So if you registered domain name already on places like Namecheap.com or Google Domains, then all you need to do is point your NS fields to AWS.
If you haven't registered a domain, you can do this via AWS Route 53.
- Go to Route 53 > Registered Domains > Register Domain button at the top. After the registration goes through, you can find it under Registered Domains.
- Route 53 > Registered Domains > Click your domain
- Click Add or Edit Name Servers (top right hand side)
Congrats! You've hooked up your domain name to your hosted zone.
Ok this will name a while for the website to show up. So grab a beer or soda. Watch some TV. Come back later.
Setting up an HTTPS domain
HTTPS connections means the pipes between your users and your servers are secure. So if your user is visiting your web site at some public wifi hot spot, nosy jokers can't sniff the traffic and see what's data is getting sent from your user to your servers and vice versa.
So, instead of pointing your A Records to S3, you will point them to Cloudfront, and you will also attach a SSL Certificate to Cloudfront.
Go to AWS Certificate Manager.
- Request a certifiate
- Add domain names, you can use wild cards. For my domains, I usually use:
- mydomain.com
- *.mydomain.com
- AWS will send a few emails to the domain owner (should be you).
- Open each email, click the approval link, and approve
After all your approvals are done you will have your SSL certificate.
Now, you'll need to attach the certificate to Cloudfront.
Go to AWS Cloudfront.
- Click Create a Distribution
- Click, under the Web section, Get Started
- Origin Domain Name: type in your S3 website name (without the http:// part). Do not select one of the pre-existing option. You should input something like mydomain.com.s3-website-us-east-1.amazonaws.com
- Viewer Protocol Policy: Select Redirect HTTP to HTTPS option
- Allowed HTTP Methods: Select the option with GET, HEAD, OPTIONS, PUT, POST, PATCH, DELETE
- Object Caching: Select Customize
- Default TTL: 300
- Max TTL: 300 (you should change this later once you are comfortable your content is good)
- Forward Cookies: All
- Forward Querystrings: Forward all/cached based on all
- Price Class: choose whatever you want
- Alternate Domain Names: type www.mydomain.com and mydomain.com as well as any other subdomains to point to this bucket
- SSL Certificate: Select Custom Cert, then the Certificate you just created for your domain
- Click Create Distribution
This will take a while. Any change that happens in Cloudfront has to propagate through the content delivery network (CDN). This means when somebody in Alabama goes to your website, the request reaches a cached copy of your website somewhere close to Alabama. When somebody in California goes to your website, the request reaches a cached copy somewhere close to California. This means your customers will experience less latency.
Almost there! You need to set Route 53 to point to Cloudfront
Go back to AWS Route 53.
- Click Hosted Zone > Select your Domain
- For each domain you want to use (mydomain.com, www.mydomain.com), you'll need set up an A record:
- Create Record Set
- Name: whatever the subdomain is (
wwwor empty) - Type: A - IPv4 Address
- Alias: yes
- Alias Target: click and wait for the list to load, then select the Cloudfront Distribution you just created
- If you don't see anything, you can go to Cloudfront > Click on your Distribution > Find the domain name, it should look something like k1dsfejy1sjqw3.cloudfront.net
- Click Save Record Set
That's it! You can go to mydomain.com and it should redirect you to https://mydomain.com! You should see your fancy new S3 site.
That's it. Here's a rundown of the services covered in this post.
Servers
- S3: Static Web Site hosting
- Lambda: Backend functions
- API Gateway: An http endpoint that your front end can use to call your back end (or you back end can use to call other back ends)
Logging
- Cloudwatch: Where Lambda logs are kept, so you can see what's happening behind the scenes and debug
Domain Tools
- Route 53: Domain registration and DNS management (tells browsers where to look for content for a domain)
- Cloudfront: Content distribution network to improve latency and a way to attach an SSL certificate for HTTPS connections
- Certificate Manager: Create free SSL certificates for your websites
Access Tools
- IAM (Identity and Access Manager): Create user access id/secret pairs so you can log into aws using terminal commands
Dev Tools
- Cloud 9: Browser based coding environment with attached terminal, which can be used sync S3/Lambda functions and stream logs